eBook Conversion

eBook conversion for Kindle and ePub readers

Introduction to the ePub format

In addition to the mobi format, used by the Kindle, the other widely used format is ePub. The ePub format is also based on HTML, although it offers more formatting options than mobi.

The good news is that the all the HTML features I’ve described for Kindle conversion also apply to ePub. So you can use the same HTML file for conversion; the only difference is that you’ll need to tweak a few conversion settings in Calibre. If you’ve written a novel, or any other type of prose with plain text, and you’re happy with the way it looks on the Kindle, then it will look pretty much the same in ePub.

In later tutorials, I’ll go through the additional formatting options that are available. But here are some things to bear in mind:

  1. As tempting as the increased formatting options are to the more design-minded of you, they’re a double-edged sword. Again, like the Kindle, there are a myriad of reading devices out there, and you need to remember that your book needs to be readable on all of them. As irritating as the formatting restrictions of the mobi format sometimes are, they do ensure a reasonably consistent experience for everyone
  2. There is much more variation in terms of screen sizes with ePub readers. Unless you’re producing ePub files for a specific device (such as the iPad), the best option for your book cover is 800 x 600 pixels
  3. Barnes & Noble has the second biggest market share for eBooks (around 20-25 per cent) and uses the ePub format; however to use B&N’s Pubit! channel, you need to have a US credit card. If you are outside the US you will have to use an aggregator. The aggregators Lulu and BookBaby let your upload ePub files; however Smashwords will only let you upload an MS Word 2003 document
  4. At the time of writing, Google is also about to start selling ePub books
  5. There is a free WYSIWYG (what you see is what you get) ePub editor available: Sigil. This is a good option if you wand to do a lot of tweaking. It doesn’t have quite the functionality of a word processor – sometimes you have to go into the HTML code – but it’s a useful option

eBook aggregators and online book stores

Where to sell your eBook isn’t a subject I want to go into deeply and there are several people on the web who are far more knowledgeable than me. However, it does have some implications for formatting and conversion, so I thought I’d better mention it.

As far as market share goes, Amazon is the by far the biggest fish in the pond. Depending on whose figures you believe, Amazon’s share of the eBook market is somewhere between 70 and 80 per cent. For this reason alone, I think it’s worth spending time making your books look as good as possible and it’s why the Kindle format is the focus of this site. Getting your book in the Kindle store is a fairly straightforward task.

Next up is Barnes & Noble, who seem to have a market share of somewhere between 15-20%. B&N sells in the ePub format. They also make it fairly straightforward to upload your file and sell through their site but there’s one catch; you must have a credit card registered to a US address. If you have one, I’d recommend doing this; however, if you don’t then there are workarounds.

Apple and Sony, despite their high profile – especially in terms of the iPad – aren’t actually selling that many eBooks themselves.

I must also add that I have no personal experience of any of the sites I’m discussing on this page; although I’m a writer and editor by profession and I’ve formatted several eBooks for friends and acquaintances, at the time of writing I have no book to sell. There are several excellent websites and people on Twitter who know much more than me about writing fiction, design, marketing and distribution.

eBook aggregators

eBook aggregators are companies who will take your file, convert it into multiple formats and make it available through multiple distribution channels. They typically make money by taking a small commission or charging an upfront fee. They often are the only way of distributing your book via Apple’s iBookstore, Sony, Kobo and Barnes & Noble.

How many channels you want to sell on is up to you, but as I’ve already mentioned, you want to be on Barnes & Noble as well as Amazon. If you can’t sell directly through them, the only aggregators that let you access this channel would appear to be Smashwords, Lulu and BookBaby.

About Smashwords

Lulu and BookBaby both give you the option of uploading ePub files. You can use online validators (such as this one) to check your file before you submit it.

Smashwords seems to have a high reputation in self-publishing circles – for the range of retail channels they offer and for their competitive pricing. However, for reasons best known to themselves, Smashwords will only accept files in Word 2003 format. The company uses a proprietary piece of software called Meatgrinder to convert Word files into the myriad of formats they offer.

Of course the problem with this kind of conversion is that it often gives you a format that could be described as acceptable but rarely looks professional. Stylistic features such as images as chapter headings and drop capitals simply aren’t allowed.

Smashwords offers a very long and detailed style guide, which you must strictly adhere to. Tales abound on the internet of files rejected by the Meatgrinder. (Paul Salvette also has a useful guide to submitting Word files to Smashwords.)

Now, you may be annoyed that I’ve encouraged you to convert your Word file into HTML for conversion and you may now have to send a Word file after all. However, all is not lost:

1. Much of the Smashwords style guide is based around using Word’s Styles and Formatting features, which I’ve encouraged you to use prior to conversion. So chances are you’ve done much of the work already
2. If you’ve done all the style work by editing the HTML code, MS Word does a fairly good job of opening simple HTML files, which you can then save as a Word document. (I’d appreciate a comment from someone who’s done this – unfortunately there’s no way for me to test the Meatgrinder without submitting a book.)

If you’re going to use Smashwords, I would encourage you to try and do your best with the software. I’ve looked through some of their free .mobi book downloads on my Kindle and several of them look pretty lousy. I suspect it’s a combination of poor author formatting and the limitations of the Meatgrinder software.

Printing on Demand

Several companies let you upload Word or PDF files and print individual books to order; after all, many people still prefer a paper book. The most famous of these is probably Lulu.

This subject is also beyond the scope of the site. If you’re going to do this in MS Word, then tweaking the Styles and Formatting attributes makes this a whole lot easier. From a page layout point of view, I’m not a fan of Word – unless you know the program well, your pages invariably end up looking like office documents.

A good solution to this may well be the free program LyX; this uses a typesetting engine called Latex, via a basic word processor-like interface. For producing prose such as novels and poems you can get some very attractive results (here’s a PDF of the first two chapters of Emma done on LyX). Although it’s not particularly difficult to use, it’s not as intuitive as MS Word and there’s not much online documentation for the beginner (although this guide isn’t bad). However, I may return to the topic if there’s enough demand, as I think it’s a very useful tool for the self-publisher.

ISBN numbers and DRM

These topics are really beyond the scope of this website – my intention was to persuade and help you produce nicely formatted eBooks. However, these are both options in the conversion process, so it would be useful to at least explain what these things are.

ISBN

ISBN stands for International Standard Book Number. It’s a 13-digit number that uniquely identifies your book. Under normal circumstances, you have to pay the relevant ISBN issuer in your country.

So do you need one? The simple answer is ‘it depends’. Amazon and Barnes & Noble, the biggest eBook retailers, do not require that you have an ISBN number. So, for example, if you only want to sell from your website and through Amazon, then it’s probably not worth worrying about. However, some online retailers, such the Apple store, do require that you do have an ISBN.

Some aggregators – companies such as Lulu and Smashwords, who will take your book and publish it in multiple formats to several retailers – issue free ISBNs as part of the deal. You can only use these ISBNs for books published through these services.

If you also want your book to sell in bookstores, then you do need an ISBN.

Some useful links

Sue Collier at BookBuzzr: Does Your ebook Need Its Own ISBN?
Joel Friedlander at The Book Designer: ISBN 101 for Self Publishers
Ron Pramschufer at Publishing Basics: Do I really need a separate ISBN for my eBook?

DRM

DRM (digital rights management) is an anti-piracy measure applied to digital files. The Amazon .azw format and the ePub format can both carry DRM if you choose to select it. It essentially ties the file to the device registered to the user and stops it being used on other devices.

Although this superficially sounds like a good idea, DRM is a double-edged sword. I’m just going to list the pros and cons and let you make up your own mind. It’s not necessary to worry about DRM as part of the conversion process — you will be given the option to apply it during the upload process to the eBook retailer (although some retailers insist on DRM, while some others don’t give you the option).

On the plus side, DRM means purchasers can’t just pass on free copies to their friends and it makes it much harder to pirate.

The cons of DRM include:

  • eBooks can’t be used across devices. For example, you can’t read Kindle books on a Nook, even if you’ve paid for them (although the Kindle application is available across several devices)
  • It can cause customer-support problems for people who have legitimately purchased content
  • DRM can be broken
  • Customers can’t make back-up copies their eBooks
  • Some consumers object to DRM on principle — it’s their book and they should be free to use it how they wish

Images as chapter headings (Kindle)

If you really don’t like the Kindle’s default chapter styles, then a workable alternative is to use an image instead. Of course, this means creating a different image for every chapter, which is time-consuming if your book is long, but it will look really nice if it’s done well. You could maybe ask the person who’s designing your cover for advice (or get him or her to do these graphics for you as well).

Instructions

Your image should be a GIF and, as discussed in the section on section break graphics, you have to enter the size of the graphic to stop the Kindle resizing it.

The CSS you need is the same as what you’ve been using for text, because graphics in this case are treated in the same way.

h1{ text-align:center; page-break-before: always; margin-bottom: 2em;}

Obviously, if you want your graphic to be left- or right-aligned, change the text-align value accordingly.

Now, putting the image in is not difficult at all; assuming your chapter headings are wrapped in <h1> … </h1> tags, simply adding the HTML code to insert an image between the tags will work. The only problem is that your conversion program has no information on which to build a table of contents.

This is not too difficult to fix; however, I’ve only been able to get this working with Calibre and not with MobiPocket Creator.

Here’s the HTML you’ll need:

<h1 title="Chapter 1"><img src="Chapter1.gif" height="221px" width="250px" alt="Chapter 1" ></h1>

The text you put in the quotes after h1 title is what will appear in the table of contents. Change the height and width values to match the size of your image.

You should also add an alt=”” tag – this is alternate text for an image. When someone is using text-to-speech, an eBook should speak this text when it encounters an image. Unfortunately the Kindle ignores this (poor show, Amazon), but you should still include it – ePub files will not validate unless images have alt tags. (Hopefully Amazon will fix this oversight in a firmware update.)

We now need to tell this to Calibre. The instructions for converting to Calibre are here; in the Table of Contents pane in the Convert dialog, press the magic wand button by the Level 1 TOC field. Enter the following values;

  • Under ‘Match HTML tags …’, enter h1
  • Under ‘Having the attribute’ enter title. Press OK

Bear in mind that, in this case, the output of Calibre’s built-in reader will not be the same as the output in Kindle Previewer or the Kindle.

A sample layout

Kindle file: imageheading.mobi
Source HTML file and images: imageheading.zip

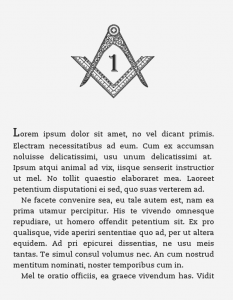
In my prospective Freemasonry-themed conspiracy thriller, I’ve used some Masonic compasses as chapter headings. In the Kindle file, these chapters output as ‘Chapter 1’ and ‘Chapter 2’ in the table of contents. The images are about 17KB each.

Sample chapter with image chapter heading (click to enlarge)

References and links

If you’re writing non-fiction, you’ll probably want to include references and possibly links to other parts of your eBook.

Fortunately, both these features are supported and, as you’re probably aware, work on the basis of hyperlinks.

The good news is that it’s much easier to do references and links in Word or Open/Libre Office, rather than having to go into the code.

Adding a reference

This method will work whether you’re doing your HTML conversion via cKEditor or via Open/Libre Office.

To add a reference in MS Word, you put the cursor where you want the citation to appear and go to Insert > Reference > Footnote. Word gives you the choice of footnotes (which appear at the bottom of the page) and endnotes (which appear at the end of the document), but it’s not important here, as they’ll all appear at the end of the book anyway.

In Open/Libre Office, it’s almost identical – go to Insert > Footnote in the main menu.

You many want to go into the code and insert a heading for your references.

Links

You can add internal links to eBooks that behave in the same way as hyperlinks on the web. (It goes without saying that your links should be internal and should not link to the internet.)

Again, it is easier to do this using a word processor. In MS Word, you need to use the Bookmarks function, outlined here. If you convert this later using cKeditor, the links should remain when you convert it to HTML. (Using MS Word’s Insert >  Hyperlink and linking to a heading does not appear to work.)

If you want to go into the HTML code (or have to fix it), the syntax is below. It is necessary to give your link a unique name (‘foo’ in this example). The hyperlink will appear on the word ‘text’. Use the following code to create the link:

text

For the link destination, place the following markup just before it:

Styles & Formatting and document conversion

I can’t repeat how much of a timesaver – and good practice – it is to use styles in your word processor document. Not only does it give consistent formatting throughout but it’s also a real time-saver and it makes conversion a whole lot easier.

In both MS Word and Open Office/Libre Office, you do this via the Styles and Formatting pane (go to Format > Styles and Formatting). If you are unfamiliar with this function, go to this site for an explanation.

For a lot of novels, you probably only need three styles – one for the chapter headings, one for the body text (preferably with an indent) and one for the first paragraph of a chapter (without an indent). If you use spaced paragraphs with no indents, then you might only need two.

Even on more technical publications I’ve worked on, I’ve often never needed more than eight or nine – mainly more heading levels and styles for numbered lists, bulleted lists and captions.

A typical layout

basicstyles.doc

This Word 2003 file will open without problems in Word and Open/Libre Office. Once open, display the Styles and Formatting dialog – in Word, select ‘Formatting in Use’ from the ‘Show’ drop-down box in the Styles and Formatting pane; in Open/Libre Office, select ‘Applied Styles’ from the drop-down box at the bottom of the Styles and Formatting box.

This sample document uses the following styles:

  • Normal – normal (indented) paragraph text
  • First – same as normal, but without an indent, for the first paragraph after a heading, indent or list
  • Heading 1 – chapter heading
  • Heading 2 – second-level heading
  • Heading 3 – third-level heading
  • Bulleted
  • Numbered
  • Indent – an indented paragraph for quotes

To be honest, that’s probably all the styles you’ll need, unless you need one for photo captions or another level of headings. Remember, the Kindle isn’t capable of displaying much more (see CSS paragraph styles).

Also, press the Show Hide ¶ button and you’ll notice there is no manual formatting at all – there are no page breaks, tab stops or double paragraph marks and all the spaces are single ones (see this page for common formatting problems).

It may be easier to paste your document into this one and apply these styles, rather than to do it yourself from scratch. However, you need to be careful, because simply pasting text, selecting Select All and applying the style can make your bold and italic formatting disappear. Try the following:

  • Delete the dummy text. Go to Edit > Select all and click on the style that will be most abundant in the document (i.e. ‘normal’). If another style appears in the list, delete it by hovering over the style, going to the drop-down list and selecting delete
  • Go to Edit > Paste Special and select ‘formatted text’ from the list. Press OK
  • You’ll then need to go through the document and apply styles for headings and first paragraphs. Rather than selecting the whole paragraph and applying the style, put the cursor within the paragraph and apply it; this should keep any bold or italics in the copy

Converting word processor files to HTML

cKeditor

If the formatting in your book is simple, then I’d recommend cKeditor, as I outlined in this post. It produces very clean, easy-to-understand HTML that doesn’t need tidying up. It has a couple of downsides:

  1. Custom paragraph styles – such as indented quotes and first paragraphs – are not exported; they have to be restored manually in the HTML code. Therefore if your book is highly formatted, it’s probably not the best choice
  2. It doesn’t save internal links (although it does honour footnotes)

In this case, you’re better off doing the conversion in Open/Libre Office.

Word processors

Although doing your composition in MS Word is fine, its HTML export – at least on Word 2003, which many people (including me) are still using – is awful.

Fortunately, the HTML export from Open/Libre Office is fairly good, if you’ve been strict with applying the styles. So, even if you don’t want to write using this program, you can use it to open your Word file when you’ve finished it and do the HTML export. Here’s a step-by step guide on the basis of this sample file:

  1. In Word, check for unwanted styles by selecting ‘available formatting’ in the Styles and Formatting pane. To get rid of any, select the drop-down list of the style and select ‘Select All’ in the list. Then click on the style you want and the unwanted one should disappear
  2. In Word, ensure all the text has the same language – select all the text and go to Tools > Language > Select Language and pick the preferred one from the list. Sometimes if you don’t do that, the converter will apply language tags to every paragraph
  3. Save and close your document, then open it in Open/Libre Office. If the program prompts you to save in other format, select ‘keep current format’; it doesn’t make much difference to the conversion process
  4. In Open/Libre Office, text with the style ‘normal’ in Word needs to be ‘text body’. You can do this using Find and Replace – open the dialog box, press the More Styles button and select Styles. Replace ‘normal’ with ‘text body’
  5. To save the document, go to File > Save As > HTML. Close the document

Tidying things up

At the top of the page, delete every line starting with <META … > h1{ text-align:center; page-break-before: always; text-decoration: underline; text-decoration: bold; margin-bottom: 2em;} h2{ text-align:left; text-decoration: bold; margin-top: 1em; margin-bottom:0em;} h3{ text-align:left; font-style: italic; margin-top: 1em; margin-bottom:0em;} p.first {text-indent: 0;} p {text-indent: 1em; margin-top: 0; margin-bottom: 0;} p.indented {text-indent:0; margin-left: 2em; margin-right: 0em;}

You now need to do some Find and Replacing. Some complicated tags have been generated, but they’re all consistent and can be fixed in five minutes or so. Refer back to your original Word or Open/Libre Office file to match up what the styles are.

Below is a list of the tags I got in my output, but they may differ slightly depending on your configuration. But it should explain the idea. Remember the tags always come before a paragraph.

Remember, in Notepad++ if you highlight some text then press Find (Ctrl-F), the text will appear automatically in the Find box.

You can keep checking how everything’s looking in the browser in Notepad++ by going to Run > Launch in … (and selecting which browser you’re using).

Type of paragraph Tag outputted by software Replace with
Normal (indented) paragraph <P CLASS=”western”> <p>
Paragraph without indent <P STYLE=”text-indent: 0cm; margin-bottom: 0cm”> <p class=”first”>
Chapter heading <H1 CLASS=”western” STYLE=”margin-top: 0cm”> or
<H1
CLASS=”western”>
<h1>
Second-level heading <H2 CLASS=”western”> <h2>
Third-level heading <H3 CLASS=”western”> <h3>
Indented text <P STYLE=”margin-left: 1cm; text-indent: 0cm; margin-top:
0.21cm”>
<p class=”indented”>

Converting files with Calibre (Kindle)

Calibre is a popular, free eBook utility and offers a sometimes bewildering array of features and options, including eBook synchronisation, downloading web content and library management. While I urge you to explore all these, I’m just going to concentrate on HTML to Kindle format conversion. Calibre is available for all platforms (Windows, Mac and Linux); this tutorial is based on the PC version, but it shouldn’t look too different in other versions. The author seems to update the software quite regularly, so forgive me if I’m a version or two behind.

Once you’ve downloaded and installed the program, there are two changes to the Preferences I would recommend. The Preferences button is on the top toolbar, but it may be hidden if you have a small screen and you’ll have to click the little arrow on the right to find it:

  • In Look and Feel, change the Icon Size to small. Even on a desktop monitor, there’s often not enough room for all the buttons to display at once
  • In Behaviour, change the Preferred Output Format to MOBI.

There are a multitude of (sometimes confusing) conversion options in Calibre, but because we’ve defined all the rules in our CSS, we can safely ignore the vast majority of them.

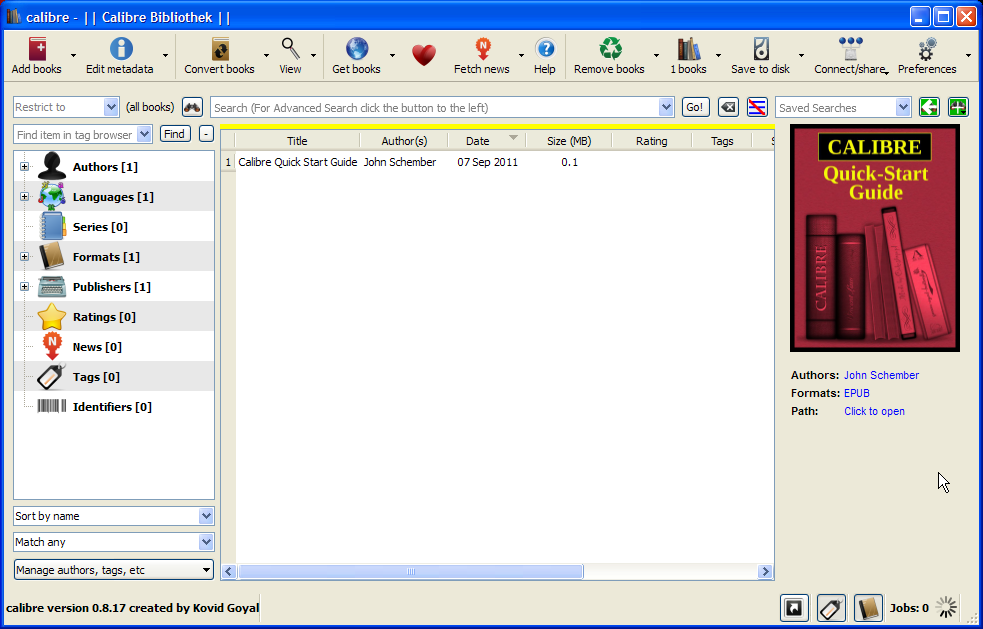
Here’s the start-up screen when you launch Calibre. In the list of projects, there’s already a copy of the Calibre Quick Start Guide.

Calibre start-up screen

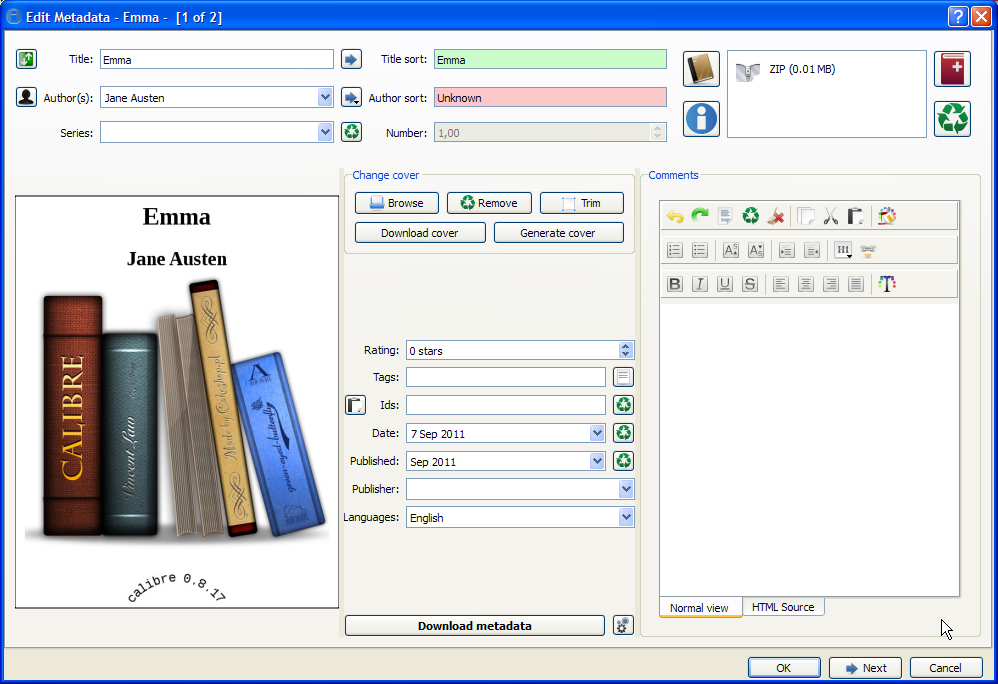
Press the Add Books button, locate your file and press OK. It will appear as a new project on the list. Select the project – I’m using Emma again as a source file – and press the Edit Metadata button.

Fill in all the fields as appropriate and upload your book cover. Calibre will generate you a book cover from the information you type in, if you press Generate Cover, but only use this for test purposes; don’t use it for the final version.

The top right of the window shows your file – Calibre converts your file to a ZIP file. Like Mobipocket Creator, you have to delete this file and add a new one if you make changes to your source – to delete a file press the button with the recycle symbol. The easiest way to add a new file is to drag it onto this window. When you’re finished, press OK.

Next, press the Convert Book button, which will display this window.

Convert Books main page

Ensure the Output Format is set to MOBI. There are loads of options in the left-hand pane – I’ll just go through the ones you need (or may need to change).

Page Setup

In the Output Profile, select Kindle.

Structure Detection

Change Chapter Mark to none.

Calibre recognises the h1, h2 and h3 heading markup. The default line of code under the heading ‘Insert page breaks before (XPath expression)’ automatically puts page breaks before the h1 and h2 headings. As I outlined here, you can set this property yourself in the CSS, so I recommend doing that and deleting the code.

MOBI Output

For reasons best known to the author, the table of contents appears at the end of the book rather than the front. You can fix this by selecting ‘Put generated Table of Contents at start of book instead of end’.

File conversion results

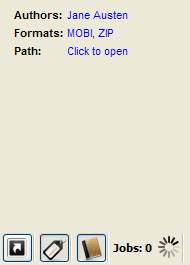
Once you’ve done all that press OK. You’ll be returned to the start-up screen and you’ll see a wheel graphic at the bottom right-hand corner. When the conversion finishes you’ll see a display like this:

Clicking on MOBI opens the book in Calibre’s built-in reader. I would recommend previewing the book in Kindle Previewer – select the ‘Click to open’ link, which will open the containing folder.

The outputted file will have a .mobi extension. Kindle Previewer may not be associated with this program, so follow the same instructions as I posted on the Mobipocket Creator page.

Converting files with Mobipocket Creator (Kindle)

The instructions below are based on the free version of Mobipocket Creator Publisher Edition 4.2. Mobipocket Creator is only available for PC.

Because you’ve created an HTML file from your original document, you can of course preview your file in any web browser, to check if everything’s looking consistent and all the images are there. If everything looks okay in the browser then the conversion should go smoothly; if not, you’ll need to fix the code. Remember that your images should be in the same folder as your HTML file.

At the bottom of many of the pages in Mobipocket Creator is an Update button. If you make any edits, make sure you press Update before leaving the page, or your changes will be lost. Forgetting to press Update is very easy to do.

Book conversion step-by-step

Clicking on any of the screen captures below will enlarge them.

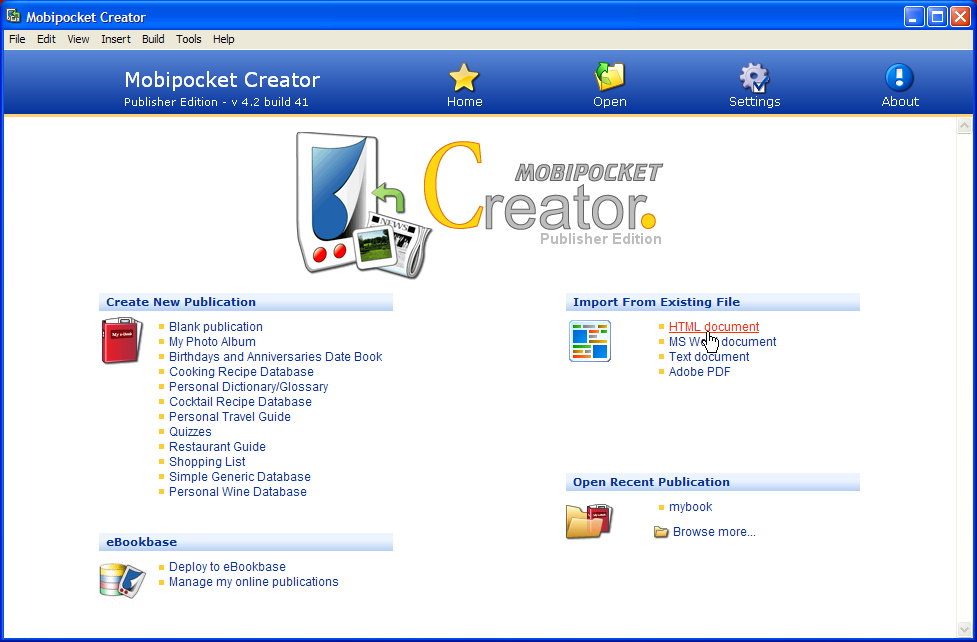
Here is the welcome screen for Mobipocket Creator. Under the ‘Import From Existing File’ heading select ‘HTML document’

Mobipocket Creator welcome screen

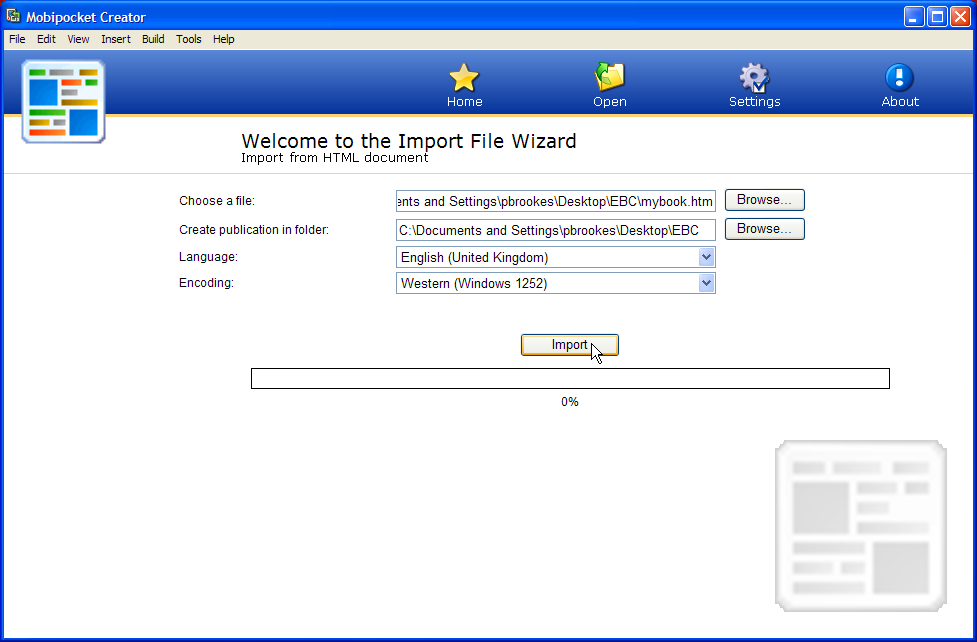
Press the Browse button by the ‘Choose a file’ field to find and select your document (alternatively you can drag the icon over the box, which will insert the filepath).

File upload page

Import File Wizard screen

Press Import to load your file. (This is usually a painless procedure; the only problem I’ve ever had is when the HTML file has no – or an incorrect – header (see Page Structure in this post for an explanation). You can ignore the other settings unless your book is in a language other than English; if so, select the correct language from the Language drop-down box.

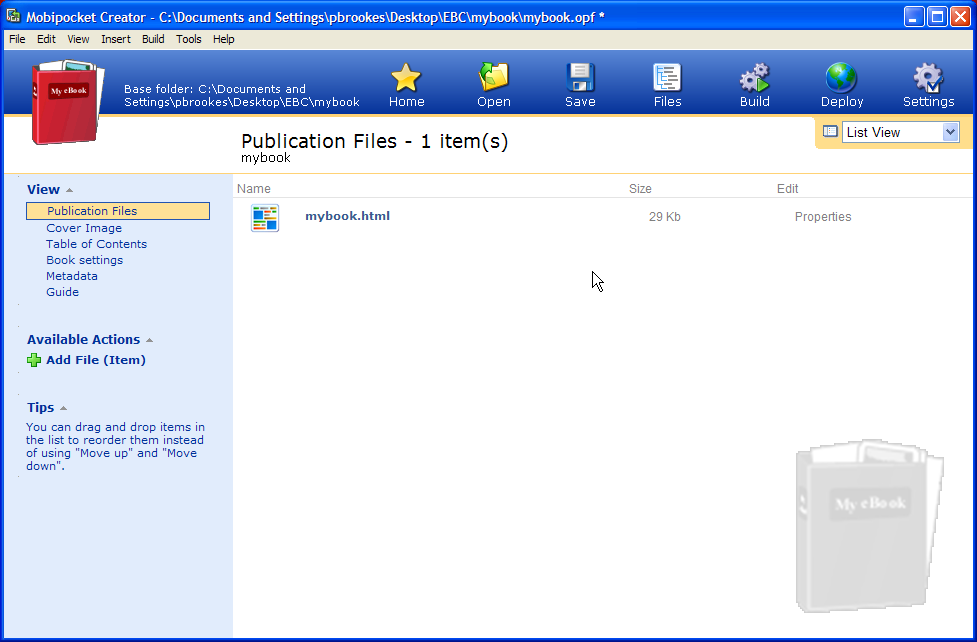
If successful, you will see this screen:

Publication Files page

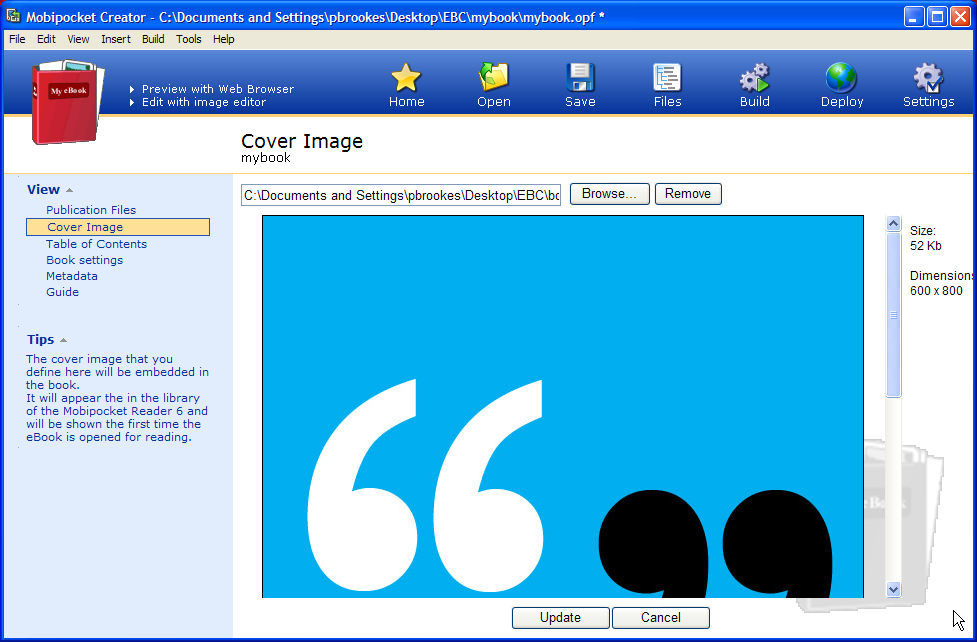
In the left-hand pane, select Cover Image. Even if you’re just testing and haven’t finalised your cover image, the software can behave oddly and produce error messages if there isn’t one there. (If you need a dummy cover image, then download this one, which is the correct size.)

Drag the cover icon over the window or press the Add a Cover Image button to navigate to the folder. Then go to the bottom of the screen and press Update.

Cover Image page

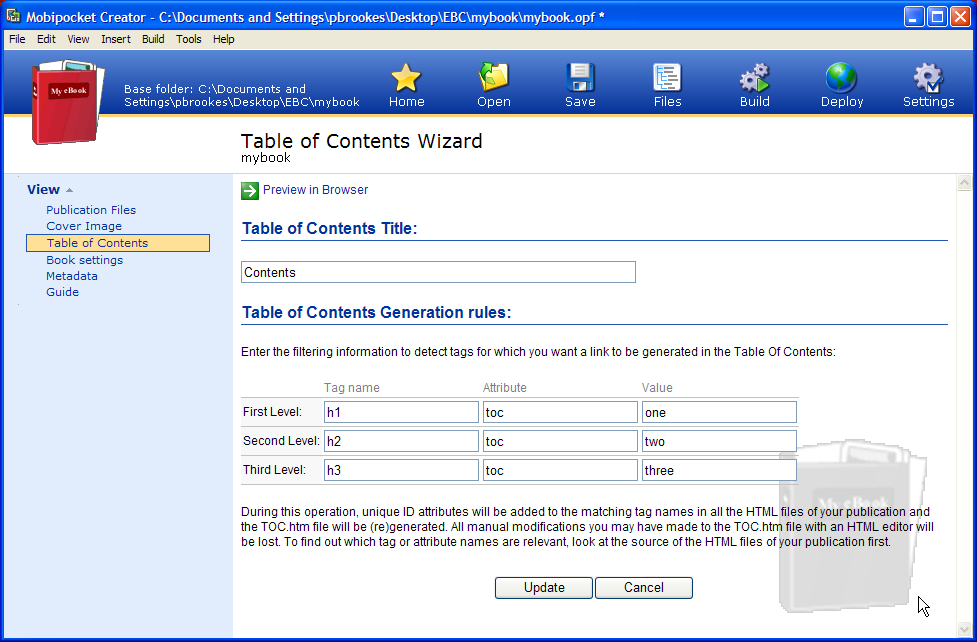
In the left-hand pane, press the Table of Contents button. The software will build the TOC for you, but only if you have your heading tags just as it likes them – see this post for details. You can have up to three levels of headings in your TOC; fill in the values as shown in the picture. You can also change the title.

Table of Contents page

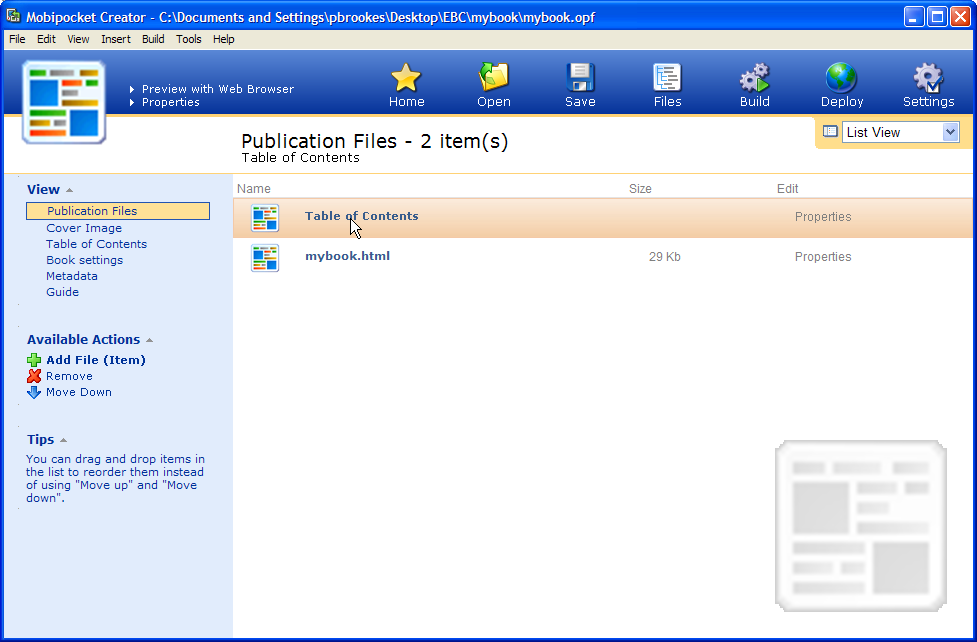
When you press update, it will take you back to the Publication Files screen, creating a new file for the TOC. If you highlight this file, you can preview the TOC by pressing the ‘Preview with Web Browser’ link at the top of the page and see if it’s working properly.

Publication files screen with Table of Contents added

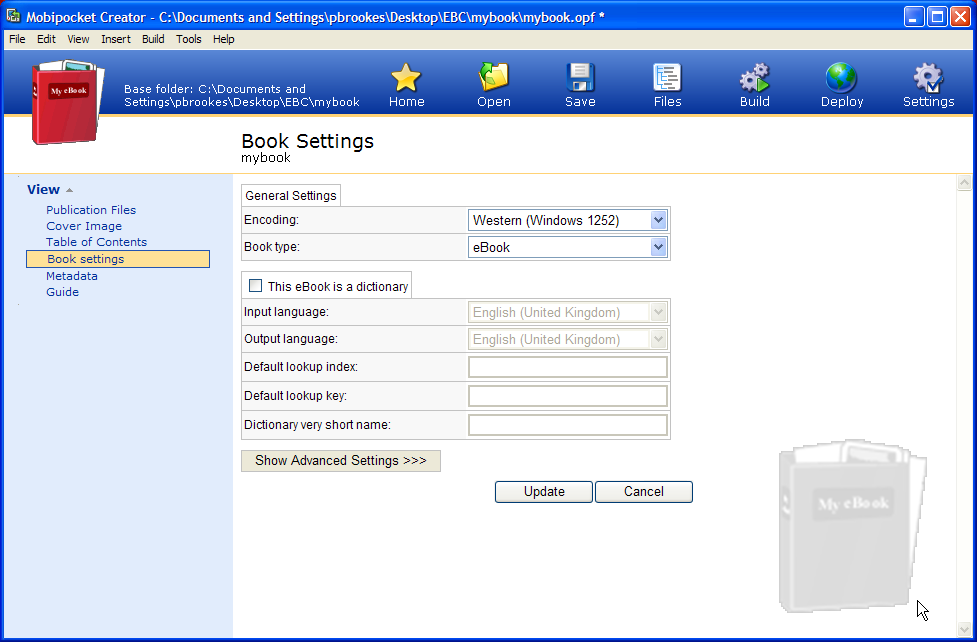
The Book Settings pane you can probably ignore, except to change the Book Type to eBook (or whatever). If your book actually is a dictionary, you’ll have to look elsewhere to find out how to fill in these fields.

Book Settings

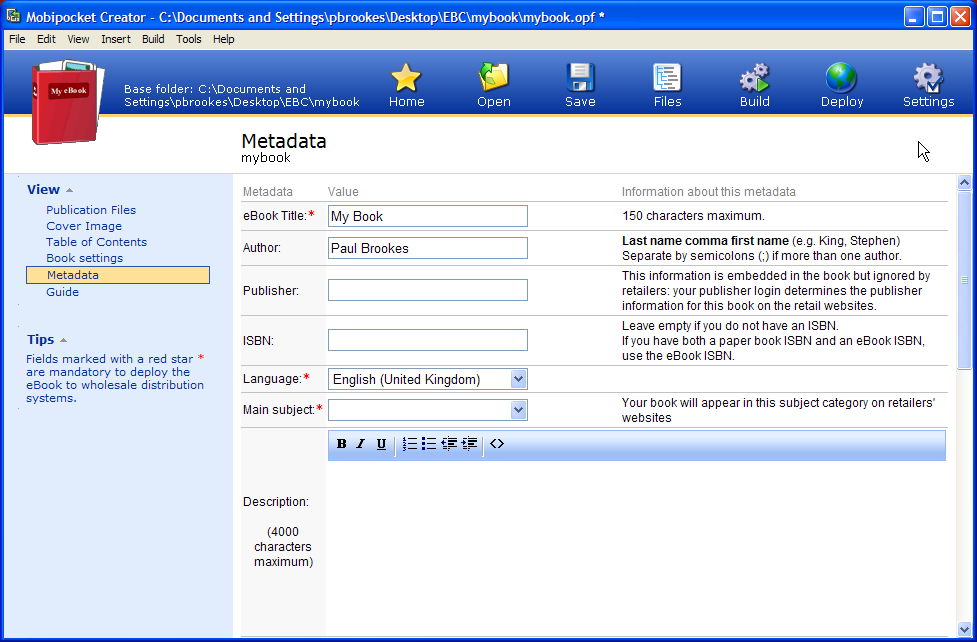
In the Metadata field, fill in as little or as much information as you like. The fields with red asterisks are mandatory. Do not forget to scroll to the bottom of the page and press Update.

The ISBN field is for the International Standard Book Number, if you have paid for one. Whether you need one or not for an eBook is debatable; I’ve outlined the subject here.


Metadata page

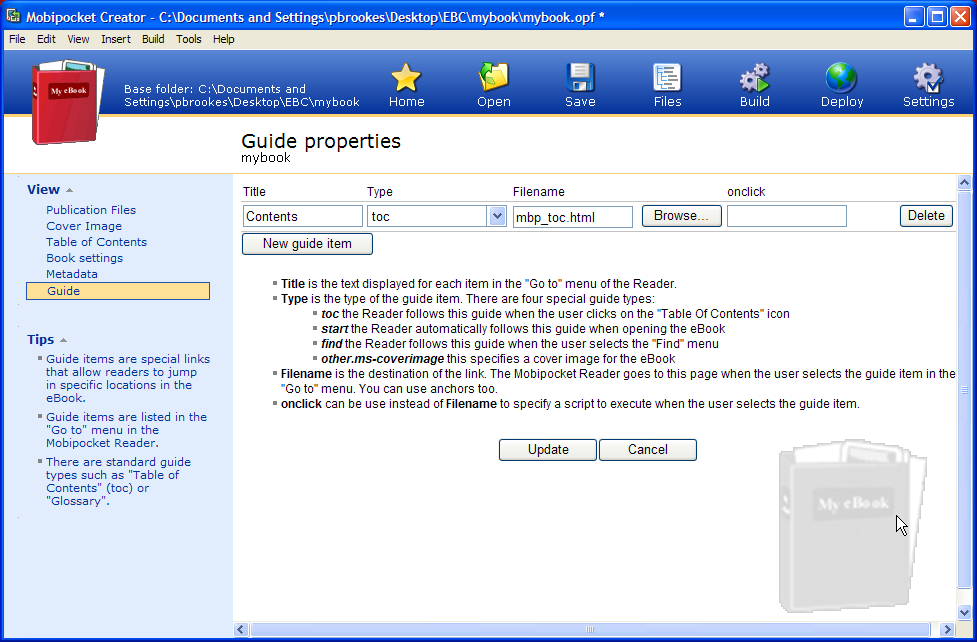
The Guide pane you can probably ignore; this is an advanced feature and I may write something in the future about using this. All it does is create additional buttons when you press Menu > Go To on your Kindle. For most people, it’s not worth worrying about.

Guide page

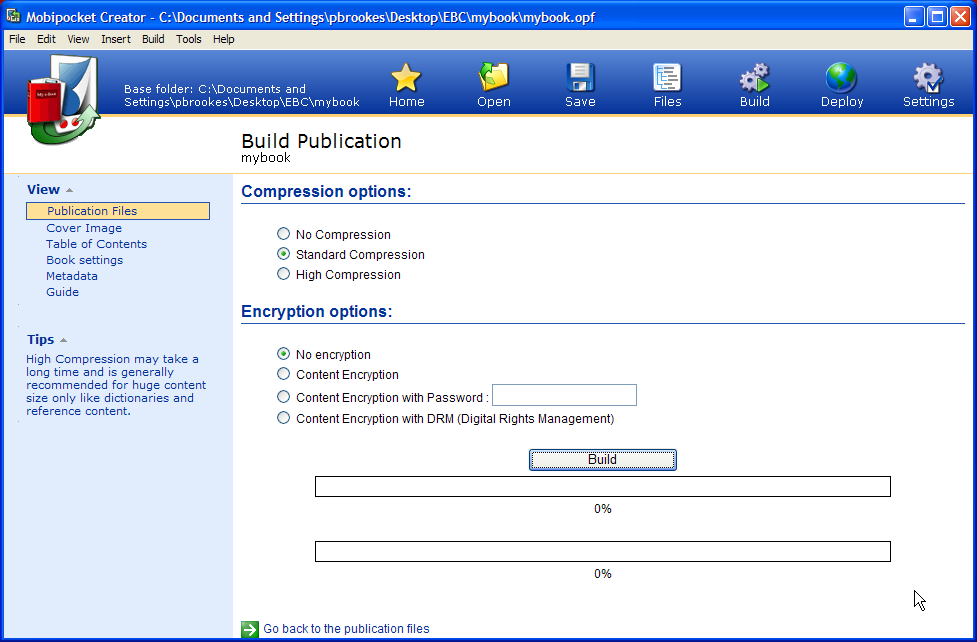
Once you’re finished, press the Build button on the top menu. I recommend keeping the default setting; you may need to select High Compression if your book is unusually large or has lots of images. Encryption (DRM) is another big topic, which I outline here; if you do decide to use it, it’s better to do it as part of the upload process when you add put your book up for sale – some vendors allow DRM; some don’t.

Build Publication page

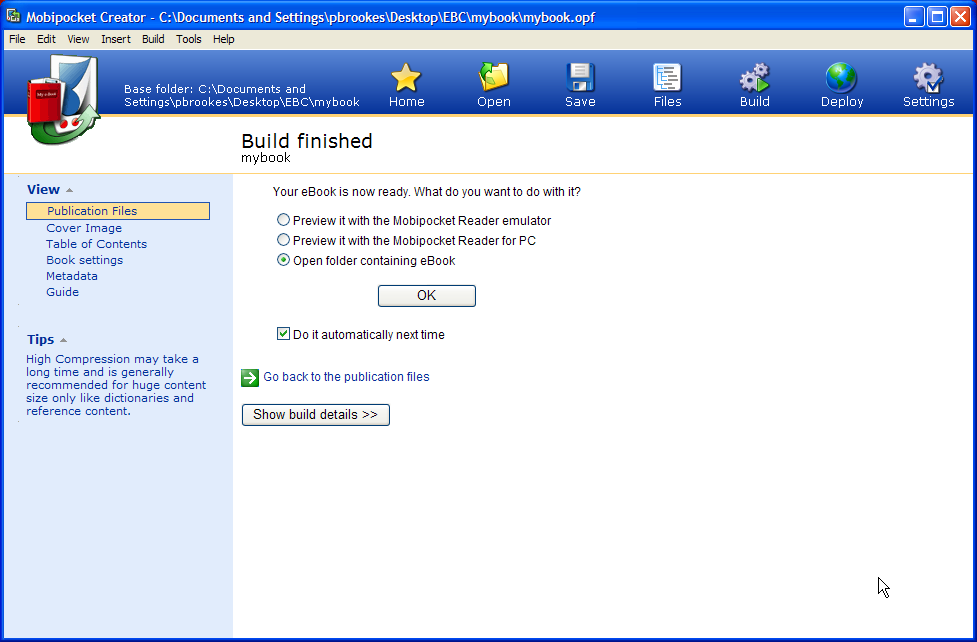
If all’s gone well, you should see this screen. For viewing the output, I recommend selecting the default ‘Open folder containing eBook’ option, which will open the folder. The file itself will have the extension .prc, which you can open in Kindle Previewer. If Kindle Previewer is not associated with the file, you’ll have to right-click on it and select Open With, then Choose Program. If Kindle Previewer is on the list, highlight it and select the ‘Always use the selected program to open this kind of file’ checkbox. If it’s not on the list, you’ll have to press Browse and hunt it down – the program is called KindlePreviewer.exe and it will probably be in C:\Documents and Settings\Local Settings\Application Data\Amazon\Kindle Previewer.

Build finished page

Troubleshooting

Here is a list of issues and fixes I’ve personally experienced in the last few months. If you can add any useful information, please leave a comment.

  1. Incorrect header in the HTML. This is a bit of text at the beginning of the HTML file that identifies it as an HTML document. It should look something like the text shown here (see Page Structure)
  2. Images in the wrong place. This is usually the result of not including a cover. Although Mobipocket Creator will output a readable file if you don’t have a cover loaded it will give you an error message and odd things may happen to the output file
  3. Updates to the file do not appear. When you update the source HTML file, you must delete the old one from Publication Files and copy over the new one. Unless you’ve made changes to headings, you shouldn’t have to build a new table of contents
  4. Data entered has gone missing. This is usually the result of forgetting to press the Update button. It’s easy to do
  5. Image not found errors. If you get this message, first check that the images are in the same folder as the file, then check that the filenames match up (remembering that they’re case sensitive). However, I’ve occasionally had this error even when the code was correct. What fixed it was adding all the images to the Publication Files page by dragging them onto the window – which is not something you should do normally – and doing a build. Once you’ve done this, the software seems to behave itself and you can delete them from the list
  6. Table of contents not outputting correctly. As I’ve mentioned, Mobipocket Creator is very fussy about this. Check the markup in Notepad++ and that you’ve filled in the fields correctly.

Table of Contents

For a table of contents, the good news is that both Calibre and Mobipocket Creator will both create contents pages based on your headings, up to level three; that is h1, h2 and h3. And as you’ll know from reading eBooks, these will be hyperlinks and will take the reader straight to the corresponding section. There’s no need to do your own TOC in MS Word, for example.

Calibre can identify the structure of your book from the file and do this automatically. I personally prefer to use Mobipocket Creator, because it’s quicker – which is important when you’re experimenting with layout – and there are fewer options to configure. However, I’ll leave the choice up to you; bear in mind, it’s PC-only. The technical details of how to configure TOCs are in the respective Calibre and Mobipocket conversion pages.

My only irritation with Mobipocket Creator is with its table of contents creator, which usually crashes unless headings have certain attributes. Fortunately, it only takes a minute or two to fix. Fire up Notepad++ and replace the following tags:

Heading tag Replace with
<h1> <h1 toc="one">
<h2> <h2 toc="two">
<h3> <h3 toc="three">


CSS paragraph styles

Following on from my post on CSS styles for headings, I’ll now go through some options for paragraph styles. As you’ll now know, paragraphs in HTML are based around the <p> … </p> tags. The instructions here represent a worse-case scenario where your conversion has carried over no formatting at all; if you apply Styles & Formatting to paragraphs in your word processor, then a lot of this may not be necessary (or may just involve changing a few strings with find and replace).

Normal paragraphs

There are really two options for separating paragraphs – indents and spaces. Now, I do not like spaced paragraphs and it’s rare that you’ll see them used in print, for pieces of prose such as novels and biographies. The problem is that it distracts the eye by leading it to the end of the paragraph. Also, especially on a Kindle, it’s a waste of what is a relatively small viewing area, meaning more page turns for the reader.

Indented paragraphs

The important thing about indented paragraphs is that the very first paragraph should not be indented (a common error I’ve seen in eBooks). This is quite easy for a normal webpage (you can use a tag called p+p), but unfortunately it doesn’t work on the Kindle – you have to do it manually.

Here’s the CSS:

p {text-indent: 1em; margin-top: 0; margin-bottom: 0;}

The first instruction tells the eReader to add an indent to the first line of anything within <p>…</p> tags. Of course, we don’t want this to apply to the first line, so we have to change the markup thus:

p.first {text-indent: 0em; margin-top: 0; margin-bottom: 0;}

Unfortunately, if all your first paragraphs are <p> … </p>, then you might have to go to the first paragraph of every chapter and manually change the tag to <p class=”first”>.

However, help may be at hand. In Notepad ++, if you press the ¶ button on the main toolbar, you’ll see these codes.

Text in Notepad++ with invisible formatting displayed

The good news is that they’re searchable and you can use the Search & Replace (Search > Replace) command to find them. Copy all the settings in the example below; \r\n is the shortcut for the hidden characters. As a non-indented paragraph always follows a heading, you can replace </h1>\r\n<p> with </h1>\r\n<p class=”first”>. Repeat this for h2 and h3 headings, by changing the h1 tag.

Search/Replace box in Notepad++ with strings for changing first paragraphs below headings

Spaced paragraphs

Spaced paragraphs are more straightforward as you only need the <p> … </p> tags. Here’s the CSS:

p {margin-top: 0.5em; margin-bottom: 0em; text-indent:0;}

Bullet points and numbered lists

There’s no need to change the Kindle’s built-in style for bullet points. The HTML is as follows:

<ul>
<li>Bullet 1</li>
<li>Bullet 2</li>
</ul>

I’ve found, using the conversion methods outlined in this post, that bullet points convert pretty well; numbered lists sometimes not. The code for a numbered list is exactly the same as a bulleted list, except you surround the list items with <ol> … </ol> instead of <ul> … </ul>. If you have a lot of numbered lists, it may be worth converting them to bullets in the source, then just changing these tags in the HTML.

To add spaces either side of lists, use <br> tags on either side of the list.

Changing text alignment

I recommend keeping the Kindle’s default fully justified text alignment, but there are instances where you’ll need to override this. The easiest way to do it is to edit the HTML thus:

<p align="right">The real evils, indeed, of Emma's situation were the power of having rather too much her own way, and a disposition to think a little too well of herself; these were the disadvantages which threatened alloy to her many enjoyments. The danger, however, was at present so unperceived, that they did not by any means rank as misfortunes with her.</p>

For left aligned text use <p align=”left”> and for centred text use <p align=”center”>

Indents

Here’s the CSS for an indent, to use – for example – for a quote.

p.indented {text-indent:0; margin-left: 2em; margin-right: 0em;}
Here's the HTML:


<p class="indented">Sixteen years had Miss Taylor been in Mr. Woodhouse's family, less as a governess than a friend, very fond of both daughters, but particularly of Emma. Between them it was more the intimacy of sisters.</p>

If you want your quotes in italics, then add font-style:italic; to your CSS:

p.indented {text-indent:0; margin-left: 2em; margin-right: 0em; font-style:italic;}

Size of indents

The Kindle has a limit on indents, presumably to stop text disappearing off the edge of the page at very large text sizes. Therefore, I’d recommend setting your paragraph indents to 1em and your quote indents to 2em (which seems to be the maximum). The Kindle ignores any values for the right margin, presumably for the same reason.

Spacing before and after indents

I haven’t had much success doing this consistently. One way around this is to put <br> tags either side of the indented paragraph in the HTML, which forces a space.

Captions

Here’s a suggestion for the CSS for a caption to go under a photo illustration (small and bold essentially):

p.caption {font-size:0.5em; text-indent: 0; font-weight:bold;}

Here’s the HTML

<p class="caption">Caption text here</p>

There is no way to prevent a caption being separated from the image it is under. One workaround may be to add the caption in a photo editor onto the image. I haven’t yet decided whether this is good idea or not – the downside is that the caption text is not searchable and it means the blind and visually impaired won’t know what the caption is.

Fixed width

Wrapping text in the <code> … </code> tags imparts a Courier-style fixed width font. The only instance I’ve used something like this is when including code in a technical publication.

Formatting poetry

Something I’ll admit I’ve no experience of. Ben Crowder has written some tips for formatting poetry for ePub and Kindle formats, which discusses things like line numbers and hanging indents.
© Paul Brookes, 2015. Powered by Wordpress.