eBook Conversion

eBook conversion for Kindle and ePub readers

References and links

If you’re writing non-fiction, you’ll probably want to include references and possibly links to other parts of your eBook.

Fortunately, both these features are supported and, as you’re probably aware, work on the basis of hyperlinks.

The good news is that it’s much easier to do references and links in Word or Open/Libre Office, rather than having to go into the code.

Adding a reference

This method will work whether you’re doing your HTML conversion via cKEditor or via Open/Libre Office.

To add a reference in MS Word, you put the cursor where you want the citation to appear and go to Insert > Reference > Footnote. Word gives you the choice of footnotes (which appear at the bottom of the page) and endnotes (which appear at the end of the document), but it’s not important here, as they’ll all appear at the end of the book anyway.

In Open/Libre Office, it’s almost identical – go to Insert > Footnote in the main menu.

You many want to go into the code and insert a heading for your references.

Links

You can add internal links to eBooks that behave in the same way as hyperlinks on the web. (It goes without saying that your links should be internal and should not link to the internet.)

Again, it is easier to do this using a word processor. In MS Word, you need to use the Bookmarks function, outlined here. If you convert this later using cKeditor, the links should remain when you convert it to HTML. (Using MS Word’s Insert >  Hyperlink and linking to a heading does not appear to work.)

If you want to go into the HTML code (or have to fix it), the syntax is below. It is necessary to give your link a unique name (‘foo’ in this example). The hyperlink will appear on the word ‘text’. Use the following code to create the link:

text

For the link destination, place the following markup just before it:

Styles & Formatting and document conversion

I can’t repeat how much of a timesaver – and good practice – it is to use styles in your word processor document. Not only does it give consistent formatting throughout but it’s also a real time-saver and it makes conversion a whole lot easier.

In both MS Word and Open Office/Libre Office, you do this via the Styles and Formatting pane (go to Format > Styles and Formatting). If you are unfamiliar with this function, go to this site for an explanation.

For a lot of novels, you probably only need three styles – one for the chapter headings, one for the body text (preferably with an indent) and one for the first paragraph of a chapter (without an indent). If you use spaced paragraphs with no indents, then you might only need two.

Even on more technical publications I’ve worked on, I’ve often never needed more than eight or nine – mainly more heading levels and styles for numbered lists, bulleted lists and captions.

A typical layout

basicstyles.doc

This Word 2003 file will open without problems in Word and Open/Libre Office. Once open, display the Styles and Formatting dialog – in Word, select ‘Formatting in Use’ from the ‘Show’ drop-down box in the Styles and Formatting pane; in Open/Libre Office, select ‘Applied Styles’ from the drop-down box at the bottom of the Styles and Formatting box.

This sample document uses the following styles:

  • Normal – normal (indented) paragraph text
  • First – same as normal, but without an indent, for the first paragraph after a heading, indent or list
  • Heading 1 – chapter heading
  • Heading 2 – second-level heading
  • Heading 3 – third-level heading
  • Bulleted
  • Numbered
  • Indent – an indented paragraph for quotes

To be honest, that’s probably all the styles you’ll need, unless you need one for photo captions or another level of headings. Remember, the Kindle isn’t capable of displaying much more (see CSS paragraph styles).

Also, press the Show Hide ¶ button and you’ll notice there is no manual formatting at all – there are no page breaks, tab stops or double paragraph marks and all the spaces are single ones (see this page for common formatting problems).

It may be easier to paste your document into this one and apply these styles, rather than to do it yourself from scratch. However, you need to be careful, because simply pasting text, selecting Select All and applying the style can make your bold and italic formatting disappear. Try the following:

  • Delete the dummy text. Go to Edit > Select all and click on the style that will be most abundant in the document (i.e. ‘normal’). If another style appears in the list, delete it by hovering over the style, going to the drop-down list and selecting delete
  • Go to Edit > Paste Special and select ‘formatted text’ from the list. Press OK
  • You’ll then need to go through the document and apply styles for headings and first paragraphs. Rather than selecting the whole paragraph and applying the style, put the cursor within the paragraph and apply it; this should keep any bold or italics in the copy

Converting word processor files to HTML

cKeditor

If the formatting in your book is simple, then I’d recommend cKeditor, as I outlined in this post. It produces very clean, easy-to-understand HTML that doesn’t need tidying up. It has a couple of downsides:

  1. Custom paragraph styles – such as indented quotes and first paragraphs – are not exported; they have to be restored manually in the HTML code. Therefore if your book is highly formatted, it’s probably not the best choice
  2. It doesn’t save internal links (although it does honour footnotes)

In this case, you’re better off doing the conversion in Open/Libre Office.

Word processors

Although doing your composition in MS Word is fine, its HTML export – at least on Word 2003, which many people (including me) are still using – is awful.

Fortunately, the HTML export from Open/Libre Office is fairly good, if you’ve been strict with applying the styles. So, even if you don’t want to write using this program, you can use it to open your Word file when you’ve finished it and do the HTML export. Here’s a step-by step guide on the basis of this sample file:

  1. In Word, check for unwanted styles by selecting ‘available formatting’ in the Styles and Formatting pane. To get rid of any, select the drop-down list of the style and select ‘Select All’ in the list. Then click on the style you want and the unwanted one should disappear
  2. In Word, ensure all the text has the same language – select all the text and go to Tools > Language > Select Language and pick the preferred one from the list. Sometimes if you don’t do that, the converter will apply language tags to every paragraph
  3. Save and close your document, then open it in Open/Libre Office. If the program prompts you to save in other format, select ‘keep current format’; it doesn’t make much difference to the conversion process
  4. In Open/Libre Office, text with the style ‘normal’ in Word needs to be ‘text body’. You can do this using Find and Replace – open the dialog box, press the More Styles button and select Styles. Replace ‘normal’ with ‘text body’
  5. To save the document, go to File > Save As > HTML. Close the document

Tidying things up

At the top of the page, delete every line starting with <META … > h1{ text-align:center; page-break-before: always; text-decoration: underline; text-decoration: bold; margin-bottom: 2em;} h2{ text-align:left; text-decoration: bold; margin-top: 1em; margin-bottom:0em;} h3{ text-align:left; font-style: italic; margin-top: 1em; margin-bottom:0em;} p.first {text-indent: 0;} p {text-indent: 1em; margin-top: 0; margin-bottom: 0;} p.indented {text-indent:0; margin-left: 2em; margin-right: 0em;}

You now need to do some Find and Replacing. Some complicated tags have been generated, but they’re all consistent and can be fixed in five minutes or so. Refer back to your original Word or Open/Libre Office file to match up what the styles are.

Below is a list of the tags I got in my output, but they may differ slightly depending on your configuration. But it should explain the idea. Remember the tags always come before a paragraph.

Remember, in Notepad++ if you highlight some text then press Find (Ctrl-F), the text will appear automatically in the Find box.

You can keep checking how everything’s looking in the browser in Notepad++ by going to Run > Launch in … (and selecting which browser you’re using).

Type of paragraph Tag outputted by software Replace with
Normal (indented) paragraph <P CLASS=”western”> <p>
Paragraph without indent <P STYLE=”text-indent: 0cm; margin-bottom: 0cm”> <p class=”first”>
Chapter heading <H1 CLASS=”western” STYLE=”margin-top: 0cm”> or
<H1
CLASS=”western”>
<h1>
Second-level heading <H2 CLASS=”western”> <h2>
Third-level heading <H3 CLASS=”western”> <h3>
Indented text <P STYLE=”margin-left: 1cm; text-indent: 0cm; margin-top:
0.21cm”>
<p class=”indented”>

Converting files with Calibre (Kindle)

Calibre is a popular, free eBook utility and offers a sometimes bewildering array of features and options, including eBook synchronisation, downloading web content and library management. While I urge you to explore all these, I’m just going to concentrate on HTML to Kindle format conversion. Calibre is available for all platforms (Windows, Mac and Linux); this tutorial is based on the PC version, but it shouldn’t look too different in other versions. The author seems to update the software quite regularly, so forgive me if I’m a version or two behind.

Once you’ve downloaded and installed the program, there are two changes to the Preferences I would recommend. The Preferences button is on the top toolbar, but it may be hidden if you have a small screen and you’ll have to click the little arrow on the right to find it:

  • In Look and Feel, change the Icon Size to small. Even on a desktop monitor, there’s often not enough room for all the buttons to display at once
  • In Behaviour, change the Preferred Output Format to MOBI.

There are a multitude of (sometimes confusing) conversion options in Calibre, but because we’ve defined all the rules in our CSS, we can safely ignore the vast majority of them.

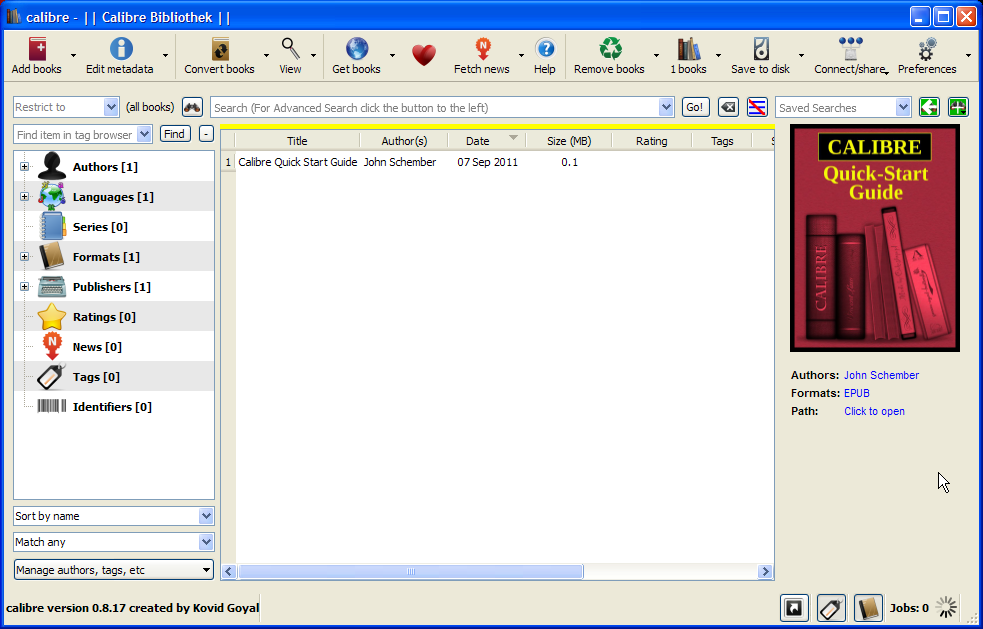
Here’s the start-up screen when you launch Calibre. In the list of projects, there’s already a copy of the Calibre Quick Start Guide.

Calibre start-up screen

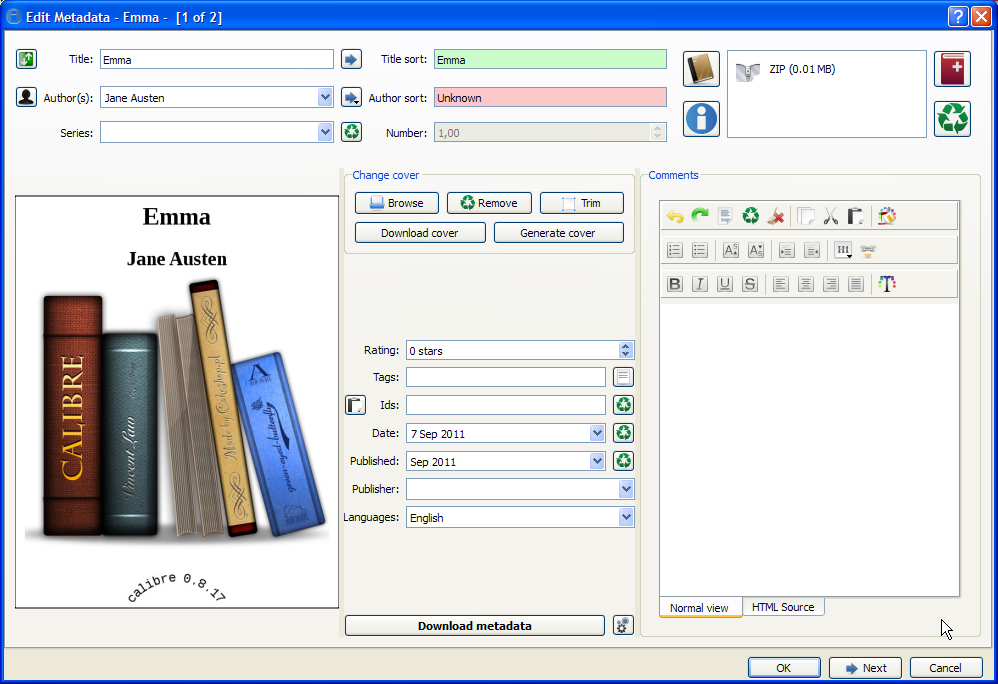
Press the Add Books button, locate your file and press OK. It will appear as a new project on the list. Select the project – I’m using Emma again as a source file – and press the Edit Metadata button.

Fill in all the fields as appropriate and upload your book cover. Calibre will generate you a book cover from the information you type in, if you press Generate Cover, but only use this for test purposes; don’t use it for the final version.

The top right of the window shows your file – Calibre converts your file to a ZIP file. Like Mobipocket Creator, you have to delete this file and add a new one if you make changes to your source – to delete a file press the button with the recycle symbol. The easiest way to add a new file is to drag it onto this window. When you’re finished, press OK.

Next, press the Convert Book button, which will display this window.

Convert Books main page

Ensure the Output Format is set to MOBI. There are loads of options in the left-hand pane – I’ll just go through the ones you need (or may need to change).

Page Setup

In the Output Profile, select Kindle.

Structure Detection

Change Chapter Mark to none.

Calibre recognises the h1, h2 and h3 heading markup. The default line of code under the heading ‘Insert page breaks before (XPath expression)’ automatically puts page breaks before the h1 and h2 headings. As I outlined here, you can set this property yourself in the CSS, so I recommend doing that and deleting the code.

MOBI Output

For reasons best known to the author, the table of contents appears at the end of the book rather than the front. You can fix this by selecting ‘Put generated Table of Contents at start of book instead of end’.

File conversion results

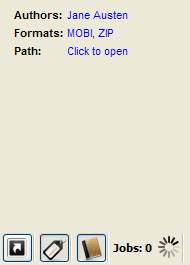
Once you’ve done all that press OK. You’ll be returned to the start-up screen and you’ll see a wheel graphic at the bottom right-hand corner. When the conversion finishes you’ll see a display like this:

Clicking on MOBI opens the book in Calibre’s built-in reader. I would recommend previewing the book in Kindle Previewer – select the ‘Click to open’ link, which will open the containing folder.

The outputted file will have a .mobi extension. Kindle Previewer may not be associated with this program, so follow the same instructions as I posted on the Mobipocket Creator page.

Converting files with Mobipocket Creator (Kindle)

The instructions below are based on the free version of Mobipocket Creator Publisher Edition 4.2. Mobipocket Creator is only available for PC.

Because you’ve created an HTML file from your original document, you can of course preview your file in any web browser, to check if everything’s looking consistent and all the images are there. If everything looks okay in the browser then the conversion should go smoothly; if not, you’ll need to fix the code. Remember that your images should be in the same folder as your HTML file.

At the bottom of many of the pages in Mobipocket Creator is an Update button. If you make any edits, make sure you press Update before leaving the page, or your changes will be lost. Forgetting to press Update is very easy to do.

Book conversion step-by-step

Clicking on any of the screen captures below will enlarge them.

Here is the welcome screen for Mobipocket Creator. Under the ‘Import From Existing File’ heading select ‘HTML document’
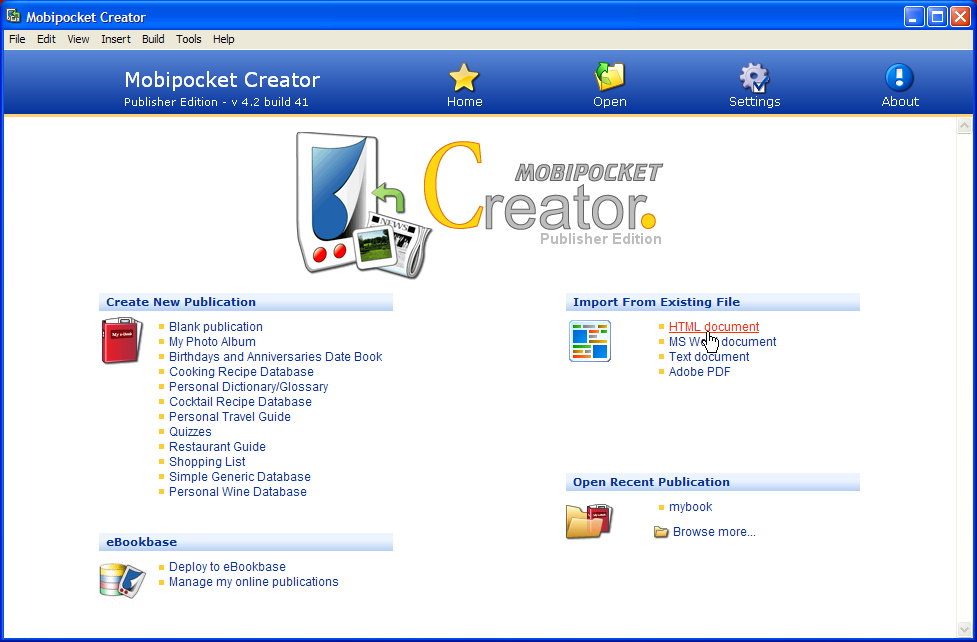
Mobipocket Creator welcome screen

Press the Browse button by the ‘Choose a file’ field to find and select your document (alternatively you can drag the icon over the box, which will insert the filepath).
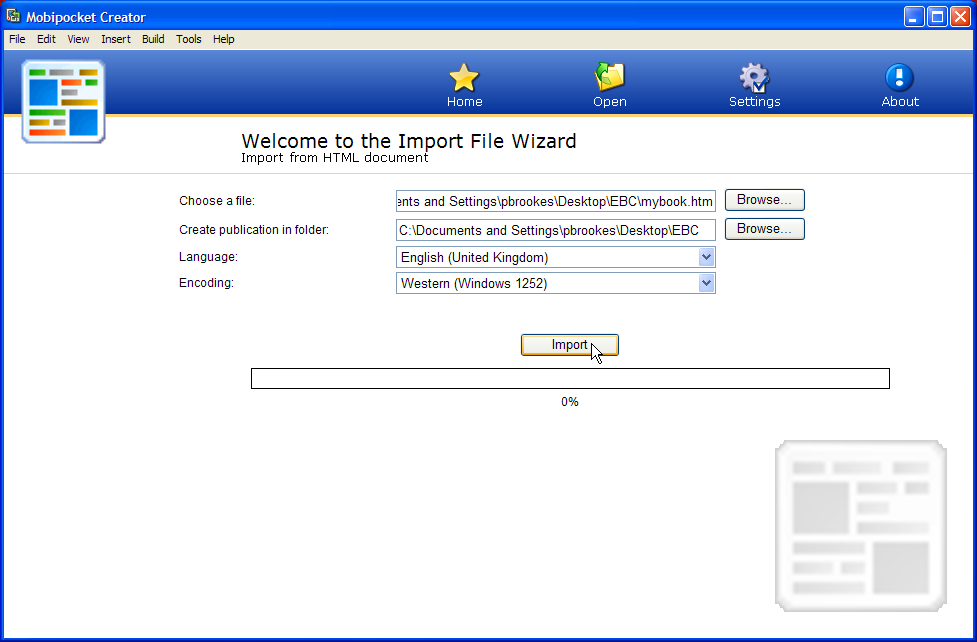
File upload page

Import File Wizard screen

Press Import to load your file. (This is usually a painless procedure; the only problem I’ve ever had is when the HTML file has no – or an incorrect – header (see Page Structure in this post for an explanation). You can ignore the other settings unless your book is in a language other than English; if so, select the correct language from the Language drop-down box.

If successful, you will see this screen:
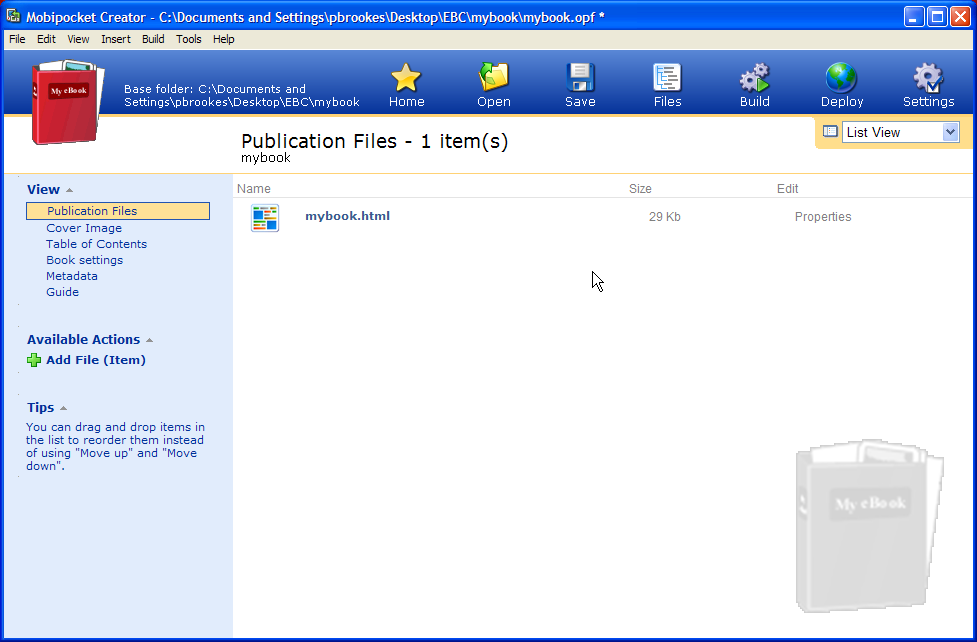
Publication Files page

In the left-hand pane, select Cover Image. Even if you’re just testing and haven’t finalised your cover image, the software can behave oddly and produce error messages if there isn’t one there. (If you need a dummy cover image, then download this one, which is the correct size.)

Drag the cover icon over the window or press the Add a Cover Image button to navigate to the folder. Then go to the bottom of the screen and press Update.
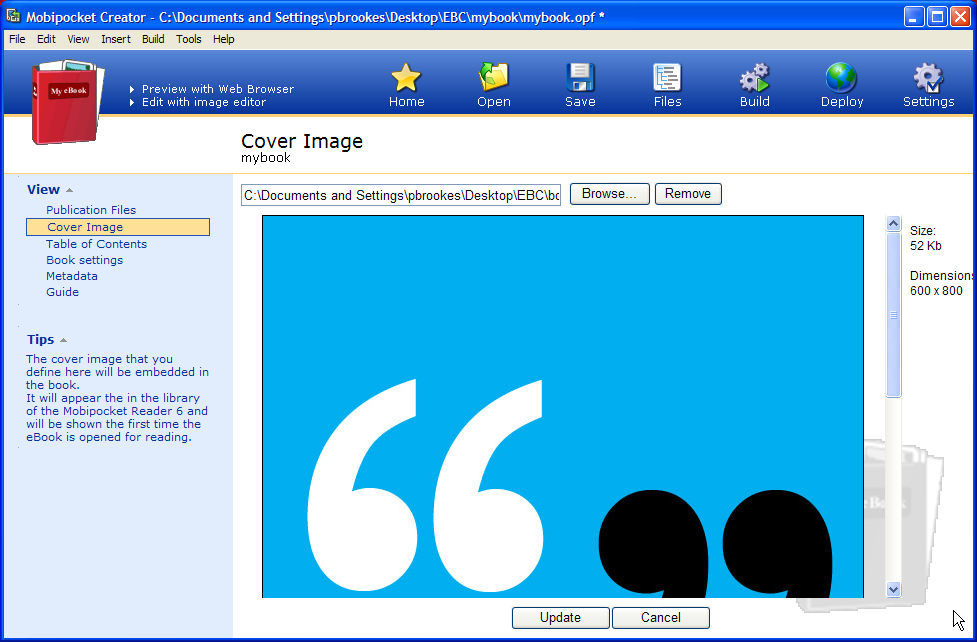
Cover Image page

In the left-hand pane, press the Table of Contents button. The software will build the TOC for you, but only if you have your heading tags just as it likes them – see this post for details. You can have up to three levels of headings in your TOC; fill in the values as shown in the picture. You can also change the title.
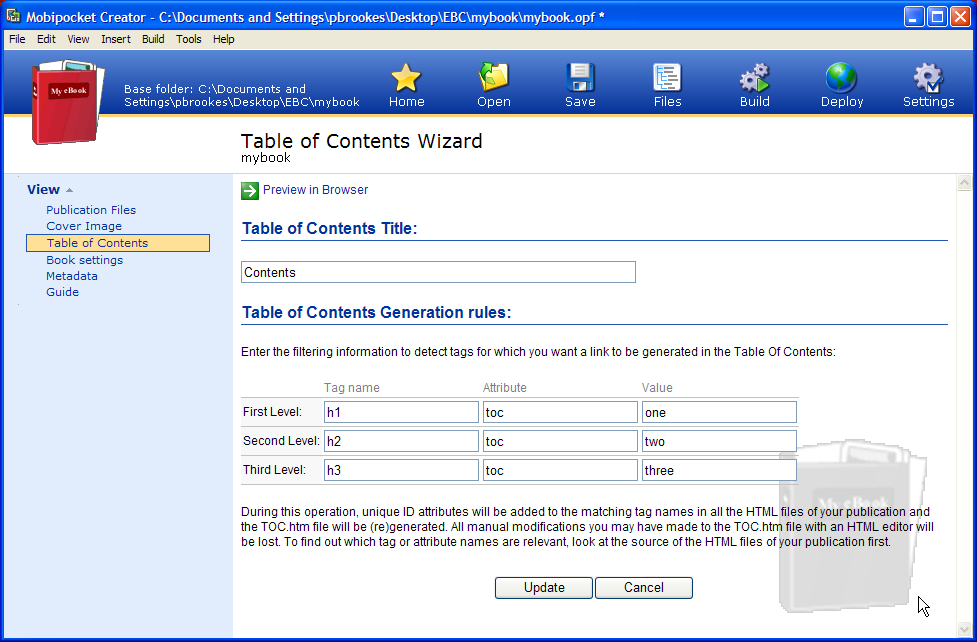
Table of Contents page

When you press update, it will take you back to the Publication Files screen, creating a new file for the TOC. If you highlight this file, you can preview the TOC by pressing the ‘Preview with Web Browser’ link at the top of the page and see if it’s working properly.
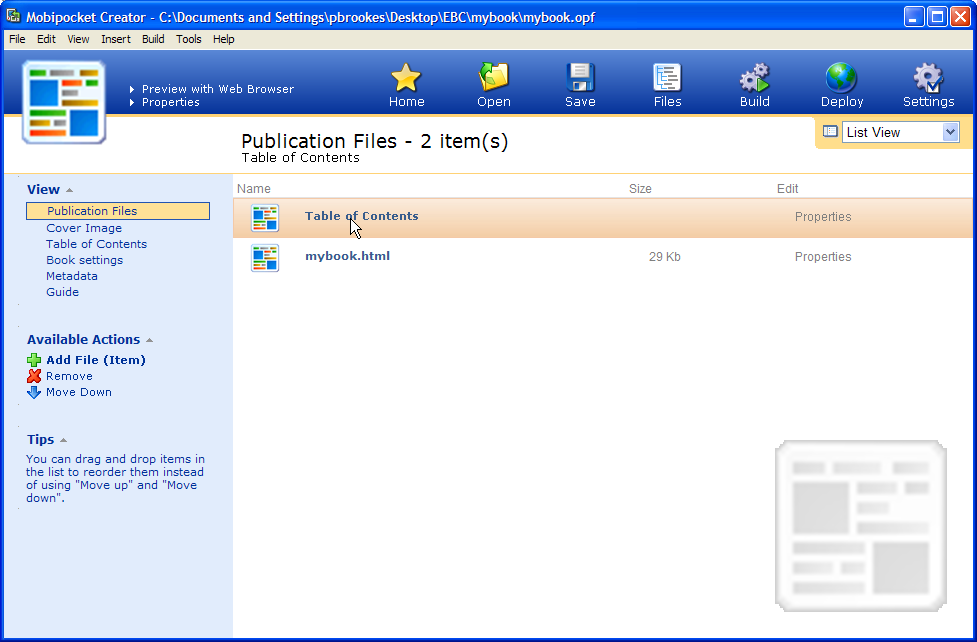
Publication files screen with Table of Contents added

The Book Settings pane you can probably ignore, except to change the Book Type to eBook (or whatever). If your book actually is a dictionary, you’ll have to look elsewhere to find out how to fill in these fields.
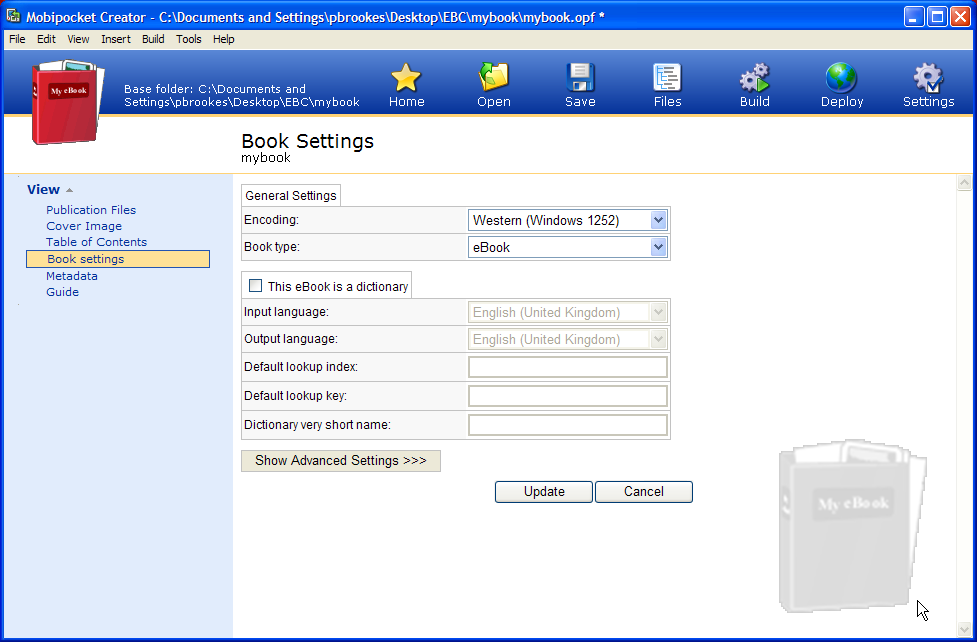
Book Settings

In the Metadata field, fill in as little or as much information as you like. The fields with red asterisks are mandatory. Do not forget to scroll to the bottom of the page and press Update.

The ISBN field is for the International Standard Book Number, if you have paid for one. Whether you need one or not for an eBook is debatable; I’ve outlined the subject here.
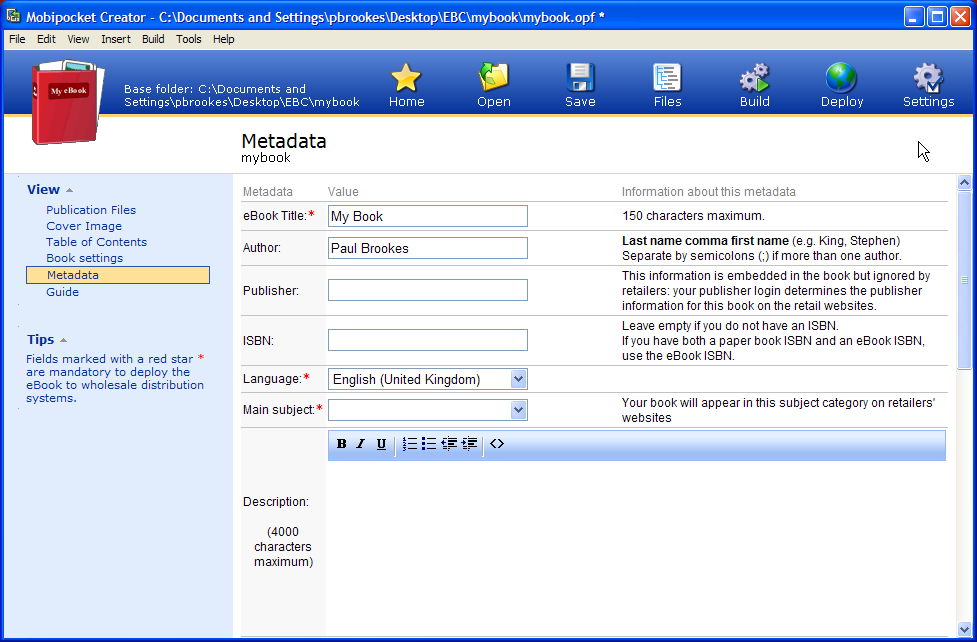
 

Metadata page

The Guide pane you can probably ignore; this is an advanced feature and I may write something in the future about using this. All it does is create additional buttons when you press Menu > Go To on your Kindle. For most people, it’s not worth worrying about.
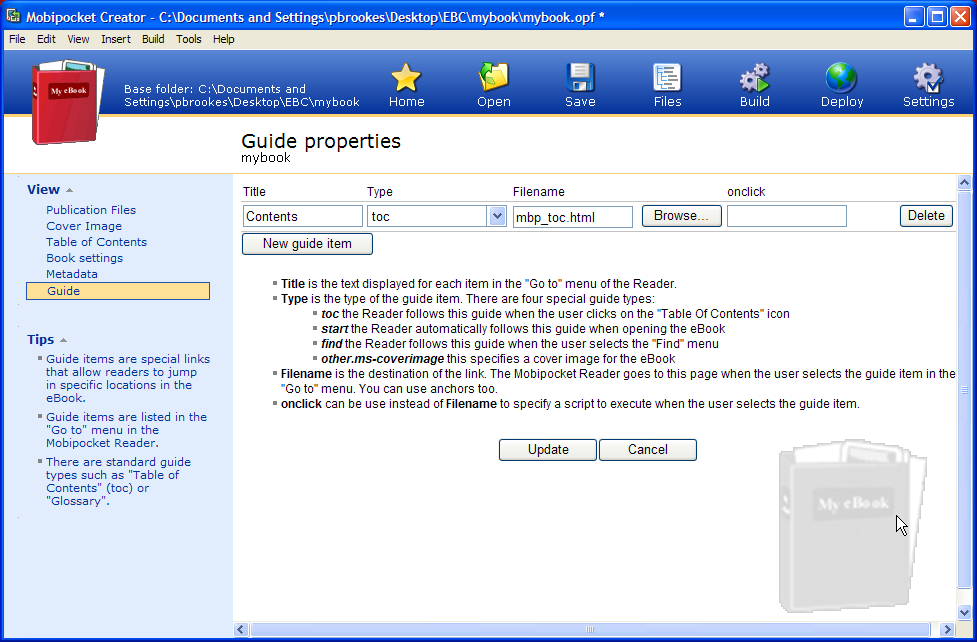
Guide page

Once you’re finished, press the Build button on the top menu. I recommend keeping the default setting; you may need to select High Compression if your book is unusually large or has lots of images. Encryption (DRM) is another big topic, which I outline here; if you do decide to use it, it’s better to do it as part of the upload process when you add put your book up for sale – some vendors allow DRM; some don’t.
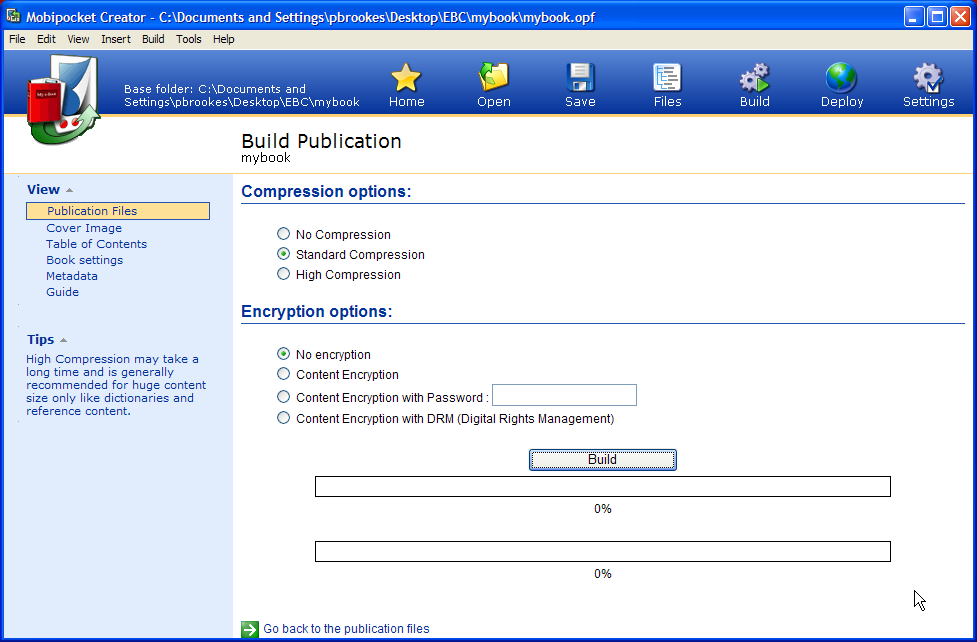
Build Publication page

If all’s gone well, you should see this screen. For viewing the output, I recommend selecting the default ‘Open folder containing eBook’ option, which will open the folder. The file itself will have the extension .prc, which you can open in Kindle Previewer. If Kindle Previewer is not associated with the file, you’ll have to right-click on it and select Open With, then Choose Program. If Kindle Previewer is on the list, highlight it and select the ‘Always use the selected program to open this kind of file’ checkbox. If it’s not on the list, you’ll have to press Browse and hunt it down – the program is called KindlePreviewer.exe and it will probably be in C:\Documents and Settings\Local Settings\Application Data\Amazon\Kindle Previewer.
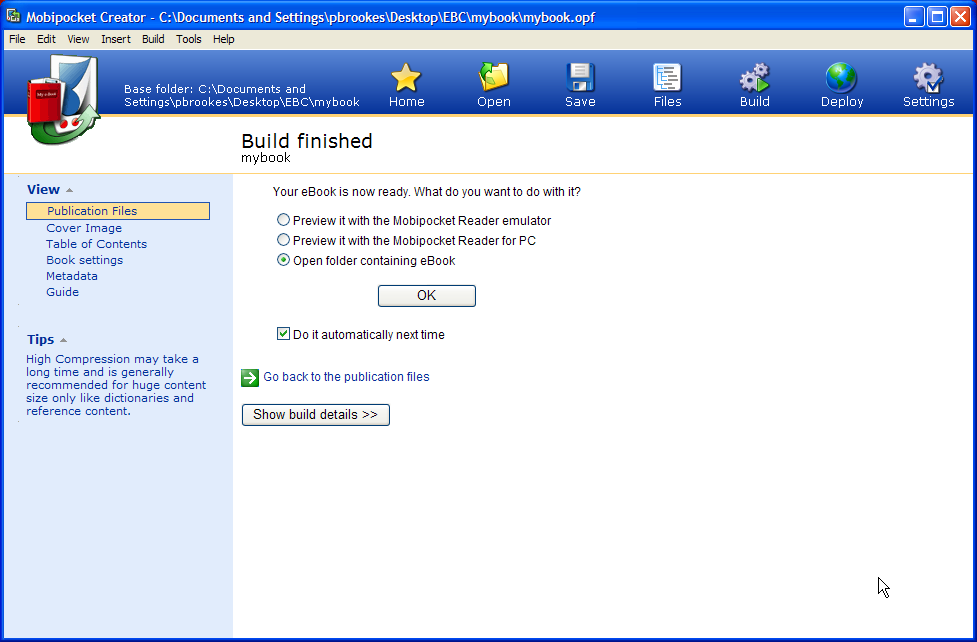
Build finished page

Troubleshooting

Here is a list of issues and fixes I’ve personally experienced in the last few months. If you can add any useful information, please leave a comment.

  1. Incorrect header in the HTML. This is a bit of text at the beginning of the HTML file that identifies it as an HTML document. It should look something like the text shown here (see Page Structure)
  2. Images in the wrong place. This is usually the result of not including a cover. Although Mobipocket Creator will output a readable file if you don’t have a cover loaded it will give you an error message and odd things may happen to the output file
  3. Updates to the file do not appear. When you update the source HTML file, you must delete the old one from Publication Files and copy over the new one. Unless you’ve made changes to headings, you shouldn’t have to build a new table of contents
  4. Data entered has gone missing. This is usually the result of forgetting to press the Update button. It’s easy to do
  5. Image not found errors. If you get this message, first check that the images are in the same folder as the file, then check that the filenames match up (remembering that they’re case sensitive). However, I’ve occasionally had this error even when the code was correct. What fixed it was adding all the images to the Publication Files page by dragging them onto the window – which is not something you should do normally – and doing a build. Once you’ve done this, the software seems to behave itself and you can delete them from the list
  6. Table of contents not outputting correctly. As I’ve mentioned, Mobipocket Creator is very fussy about this. Check the markup in Notepad++ and that you’ve filled in the fields correctly.
Recommended software

The good news is that you can generally do your self-publishing project with open source and free software. I imagine better, paid-for software is probably available, but I’ll leave that for other people to comment – sadly, I’m not in the pocket of Big Publishing (although I would like to be).

In this area, the PC platform is generally better catered for than the Mac.

Read the rest of this entry »

© Paul Brookes, 2015. Powered by Wordpress.